Cahute est une bibliothèque et un ensemble d'utilitaires en ligne de commande développée en C pour interagir avec les calculatrices CASIO. Il s'agit d'un projet que je développe depuis plus d'un an à présent (la version 0.1 a été publiée en mars 2024). Parmi les éléments de ce projet, se trouve une documentation détaillée, éditée et publiée sous format HTML statique avec Sphinx, qui vient de l'écosystème Python.
Cependant, afin d'en faire usage avec Cahute, j'ai dû y apporter quelques modifications, représentées sous la forme d'extensions et de surcharges. Ces modifications sont décrites dans les modifications suivantes.
Ce projet, comme bien d'autres, utilise un thème Sphinx appelé Furo par Pradyun Gedam. Il s'agit d'un thème que j'ai appris à utiliser et aimer grâce à Florian Strzelecki, tandis que je travaillais à Powens, et il s'agit d'un thème que beaucoup de projets utilisent dans l'écosystème Python, y compris pip et setuptools.
Pour la plupart de mes cas d'usage, Furo a un ensemble d'options de personnalisation assez fourni :
Deux sets de documentation sont publiés pour Cahute, l'une représentant la dernière version publiée sur cahuteproject.org, l'autre représentant le dernier commit ajouté sur develop (ce que certains projets appellent "bleeding edge") sur next.cahuteproject.org. Pour la seconde, je voulais ajouter un avertissement pour souligner que certaines fonctionnalités n'étaient pas présentes dans la dernière version. Ceci peut être ajouté en définissant html_theme_options["announcement"] ;
Puisque Cahute est un projet qui est centré autour de la communauté et des relations de Planète Casio, je voulais ajouter une bannière en bas de page pour y faire référence. Ceci peut être ajouté en définissant html_theme_options["footer_icons"].
Pour mes autres problématiques, j'ai dû creuser un peu plus profondément.
Une modification que je n'ai pas pu ajouter via les options de personnalisation du thème est l'ajout d'une mention arbitraire dans le pied de page. Je voulais ajouter une mention à Massena comme auteur·ice de l'illustration présente en haut de chaque page.
Afin de faire cela, j'ai dû surcharger le template page.html de Furo pour ajouter la mention, ce qui a signifié le copier pour ne garder que le bloc footer (plus près des mentions), et ajouter {% extends "!page.html" %} en haut pour ne surcharger que ce bloc mais laisser le reste. À noter que j'ai aussi dû définir templates_path dans conf.py pour que Sphinx prenne la surcharge en compte.
Pied de page obtenu, avec la mention additionelle.
Voyez page.html pour le résultat.
La documentation de Cahute inclue des diagrammes, tels que des diagrammes de séquence pour les flows des protocoles de communication (voir CAS40 flows pour un exemple). Ces diagrammes utilisent Mermaid avec l'extension sphinxcontrib-mermaid, qui ajoute la directive reStructuredText .. mermaid:: que je peux utiliser.
Cependant, Mermaid ne s'intègre pas tout à fait bien avec les thèmes clair/sombre de Furo, puisqu'aucun thème Mermaid ne fonctionne avec les deux, et il est possible de changer d'un thème à l'autre dynamiquement avec Furo. J'ai dû ajouter du code Javascript pour détecter le thème et lorsqu'il est mis à jour, et mettre à jour le thème utilisé par les diagrammes Mermaid.
Le code complet peut être trouvé dans conf.py, défini via le paramètre mermaid_init_js utilisé par sphinxcontrib-mermaid pour remplacer le template par défaut. Le résultat est le suivant :

Exemple d'utilisation du changement de thème, avec conséquences sur l'apparence d'un diagramme Mermaid.
Dans les sections suivantes, je présente différents aspects de ma démarche.
Déterminer le thème courant (sombre ou clair) de Furo est un peu complexe, mais pas impossible ; je peux calculer la valeur courante de la variable CSS --color-code-foreground sur l'élément <body>. Voici une fonction Javascript pour le faire :
function isDarkMode() {
    const color = (
        getComputedStyle(document.body)
        .getPropertyValue("--color-code-foreground")
    );

    if (color == "#d0d0d0")
        return true;

    return false;
}
Afin de déterminer lorsque le thème change, je peux utiliser MutationObserver sur l'attribut data-theme de l'élément <body>, défini par Furo. Voici le code Javascript pour le faire :
const observer = new MutationObserver(function(mutations) {
    mutations.forEach(function(mutation) {
        if (
            mutation.type != "attributes"
            || mutation.attributeName != "data-theme"
        )
            return;

        // ...
    });
});

(function (window) {
    // ...
    observer.observe(document.body, {attributes: true});
})(window);
Cette partie est plus compliquée, puisqu'elle nécessite de comprendre comment Mermaid initialise les diagrammes dans le code.
Lorsqu'initialisés sur la page, Mermaid cherche des éléments HTML <div> avec la classe mermaid. Il prend le contenu comme texte, supposé être du code source Mermaid, et remplace le contenu avec le diagramme rendu. Il ajoute ensuite l'attribut HTML data-processed à l'élément.
Ceci, par défaut, signifie que le code source disparaît, et qu'il est impossible de relancer le rendu
This, by default, means that the source code disappears in such cases, and we cannot rerender diagrams by default. So our first step is to do the same exploration as Mermaid before it is run, and save the contents into an attribute of ours, which we call data-original-code.
After saving the initial code, we can run Mermaid as intended. If we need to recompute diagrams with a new theme, we must explore all <div class="mermaid"> nodes again, restore the code into the div's content from its data-original-code attribute, remove the data-processed attribute, and re-run Mermaid.
A snippet do to all of that, using the previously defined isDarkMode to select the theme we want, is the following:
import mermaid from "https://cdn.jsdelivr.net/npm/mermaid/dist/mermaid.esm.min.mjs";

function initializeMermaid(isStart) {
    mermaid.initialize({
        startOnLoad: isStart,
        theme: isDarkMode() ? "dark" : "base",
        darkMode: isDarkMode(),
        securityLevel: "antiscript"
    });
}

function recomputeMermaid() {
    const nodes = document.querySelectorAll(".mermaid");
    nodes.forEach(node => {
        /* Restore the original code before reprocessing. */
        node.innerHTML = node.getAttribute("data-original-code");

        /* Remove the attribute saying data is processed; it is not! */
        if (node.hasAttribute("data-processed"))
            node.removeAttribute("data-processed");
    });

    initializeMermaid(false);
    mermaid.run({nodes: nodes, querySelector: ".mermaid"});
}
By default, Sphinx renders table-of-contents (TOC) trees as a simple list, which takes up a lot of space to display less content:
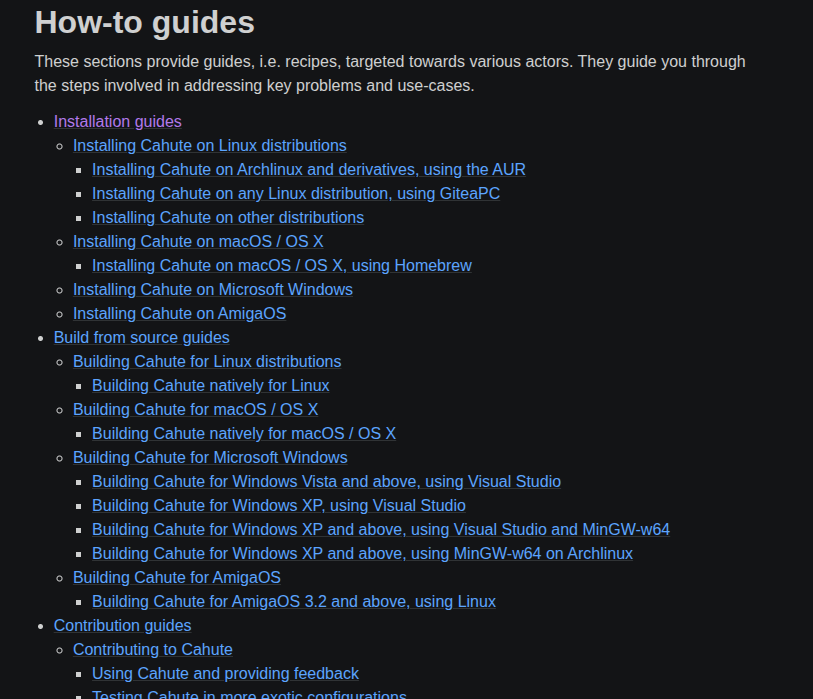
An example of a section in the Cahute documentation index, with the default TOC tree rendering.
We want to render such TOC trees on the index as two columns, if we have enough space (width).
First, we need a way to target the index page only using CSS. Fortunately, docutils places all of its rendered context within a <section> tag with an id set to a normalized version of what's in the document title. Here, since our section title is Cahute |version| (where |version| is a substitution replaced by the actual version on rendering), the generated identifier for the <section> tag is cahute-version, so we can target #cahute-version.
Next, in order to make two columns, we can use flexboxes. This will result in the following code, placed in custom2.css:
#cahute-version .toctree-wrapper > ul {
    display: flex;
    list-style-type: none;
    flex-wrap: wrap;
    padding-left: 0;
    gap: .5em 1em;
}

#cahute-version .toctree-wrapper > ul > li {
    display: inline-block;
    flex: 1 0 20em;
}
Which renders as the following:
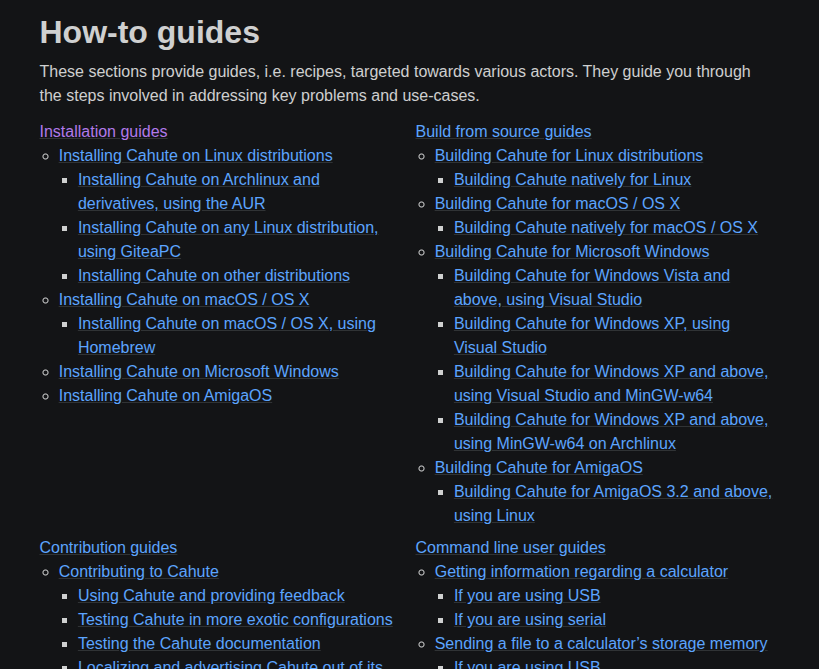
The same example of a section in the Cahute documentation index, with the new two-column TOC tree rendering.
Under the hood, Sphinx uses docutils to read reStructuredText formatted documents and render them in many formats, including HTML. I've already written about customizing docutils in Utiliser et adapter docutils, but since this project is not centered around it, my goal is to write to the point code only.
Some of the modifications below will require me to implement HTML rendering for some custom elements, or update HTML rendering for some elements. In order to do this, I write my class inheriting from sphinx.writers.html.HTMLTranslator, and set the translator using sphinx.application.Sphinx.set_translator.
The HTML translator is written as a classic docutils node visitor, using visit_<node class name> and depart_<node class name> methods. Visit methods can also raise the following exceptions:
SkipNode: the children won't be visited, the departure method won't be called;
SkipChildren: the children won't be visited, the departure method will be called;
SkipDeparture: the children will be visited, the departure method won't be called.
I commissioned Massena to make an illustration for Cahute, to both include in promotional material for Cahute (forum posts and social media only for now) as well as include as a cover image for page titles in the documentation, to give it a little more panache.
In order to add the illustration as a cover image for the page titles, I need to override the HTML rendering code for docutils' title node, i.e. override visit_title.
The HTML output for a page title, identified by checking we are not in a special context and that our section level is 1 (i.e. if we are not within a container node, even indirectly), is replaced from <h1>...</h1> to something like the following:
<div class="title-container">
    <div class="title-contrast"><hr /></div>
    <h1>...</h1>
</div>
Cahute's documentation uses Diátaxis, and I consider this to be a contract between the reader and the writer; therefore, the structure must appear as clear as day, in every place it can.
Until recently, all top-most sections appeared in the sidebar unseparated, their nature (guide, topic or reference) only appearing in their title. However, it is possible in Sphinx to add titles to sections, by adding a :title: property on the corresponding .. toctree:: directive on the index page.
However, when doing this, the title also appeared above the TOC tree, which was repetitive with the title above and undersirable:
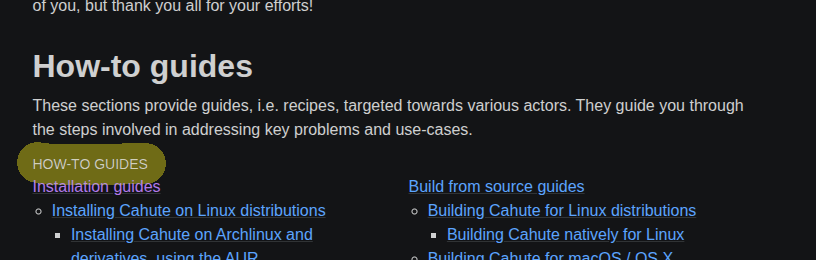
Title appearing above the TOC tree by default, highlighted.
In order to remove this, in our custom HTML translator, we need to add another block to visit_title to identify such cases and raise a SkipNode in this case. The correct identification algorithm I've found is the following:
If our parent is an sphinx.addnodes.compact_paragraph instance with its toctree attribute set. This corresponds to two cases: the TOC tree in the sidebar, and the TOC tree within the index page; however, we only want to identify the second one.
If our grandparent is a docutils.nodes.compound with the toctree-wrapper class, which allows us to only select the second case.
This results in the following block:
if (
    isinstance(node.parent, addnodes.compact_paragraph)
    and node.parent.get("toctree")
    and isinstance(node.parent.parent, nodes.compound)
    and "toctree-wrapper" in node.parent.parent.get("classes", ())
):
    raise nodes.SkipNode()
In order to highlight the Cahute features, I wanted to make an element to present them as this:
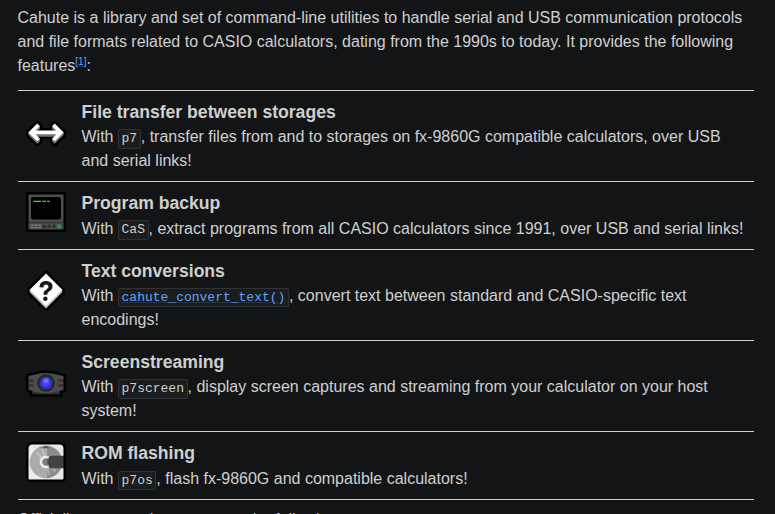
A list of features listed for Cahute 0.6.
Out of a list resembling the following:
.. feature-list::

    * - |feat-transfer|
      - File transfer between storages
      - With ``p7``, transfer files from and to storages on
        fx-9860G compatible calculators, over USB and serial links!
    * - |feat-program|
      - Program backup
      - With ``CaS``, extract programs from all CASIO calculators since
        1991, over USB and serial links!

.. |feat-transfer| image:: feat-transfer.svg
.. |feat-program| image:: feat-program.svg
In order to do this, I did the following:
Create the feature_list, feature, feature_icons, feature_title and feature_detail nodes. The idea was to obtain this in the document obtained from parsing the original document:
<feature_list>
  <feature>
    <feature_icons>
      <image uri="..."></image>
    </feature_icons>
    <feature_title>
      ...
    </feature_title>
    <feature_detail>
      ...
    </feature_detail>
  </feature>
  <feature>
    ....
  </feature>
</feature_list>
Create the FeatureListDirective which obtains this tree from a two-level list passed as the content, and register it using sphinx.application.Sphinx.add_directive;
Add the HTML rendering functions in the custom HTML translator, e.g. visit_feature_list, and so on.
In order to highlight the systems supported by Cahute, as well as present the guides associated with them directly, I wanted to make an element to present them as this:

A list of systems and related guides listed for Cahute 0.6.
Out of a list resembling the following:
.. system-list::

    * - |system-arch|
      - :ref:`feature-topic-system-arch`
      - :ref:`Install from the AUR <install-guide-linux-aur>`
      - :ref:`Install using GiteaPC <install-guide-linux-giteapc>`
      - :ref:`Build natively <build-guide-linux-sh>`
    * - |system-apple|
      - :ref:`feature-topic-system-macos`
      - :ref:`Install using Homebrew <install-guide-macos-homebrew>`
      - :ref:`Build natively <build-guide-macos-sh>`

.. |system-arch| image:: guides/install/arch.svg
.. |system-apple| image:: guides/install/apple.svg
In order to do this, I did the following:
Create the system_list, system, system_icon and system_detail nodes. The idea was to obtain this in the document obtained from parsing the original document:
<system_list>
  <system>
    <system_icon>
      <image uri="..."></image>
    </system_icon>
    <system_detail>
      ...
      <bullet_list>
        <list_item>
          <reference>...</reference>
          <reference>...</reference>
          ...
        </list_item>
      </bullet_list>
    </system_detail>
  </system>
  <system>
    ....
  </system>
</system_list>
Create the SystemListDirective which obtains this tree from a two-level list passed as the content, and register it using sphinx.application.Sphinx.add_directive;
Add the HTML rendering functions in the custom HTML translator, e.g. visit_system_list, and so on.
Some parts of the documentation are repetitive, because they are a reference with mostly similar examples and structures, with only a few bits changing. While in code, there are principles such as DRY to avoid repeating information and make templates and whatnot, this does not apply to documentation, where in order to get information across, you must adapt to the human psyche and repeat the information in multiple places so that it gets picked up along the way.
In such cases where the presentation is mostly the same, it is sometimes best, in order to avoid typos and make it more maintainable, to make a directive that automates most of the presentation.
Currently in Cahute, there is only one such example.
In the Known Protocol 7.00 commands by CASIO and Known Protocol 7.00 command extensions in fxRemote pages, you can find a reference of Protocol 7.00 commands, all having the same format with different argument usage. Every command has the following presentation:
A title with the command code in ASCII-HEX, and name in quotes;
A reference of the D1 to D6 parameters, with description and format;
A description of the command;
An example of the command, including a checksum (!).
In the related guide, everything but the title is automated using the seven-command directive. For example:
.. seven-command::
    :code: 02
    :d1: Baud rate in decimal format.
    :d1-example: 19200
    :d2: Parity, among "ODD", "EVEN" or "NONE".
    :d2-example: EVEN
    :d3: Stop bits, "1" or "2".
    :d3-example: 2

    If connected to the passive device using a serial link, this command
    signifies a request to communicate using different serial parameters.

    .. note::

        The serial speeds are limited to the following speeds (or baud
        rates): 300, 600, 1200, 2400, 4800, 9600 (*by default*), 19200,
        38400, 57600 and 115200 bauds.

    See :ref:`protocol-topic-seven-update-serial-params` for more
    information.
This example will generate a presentation such as the following:
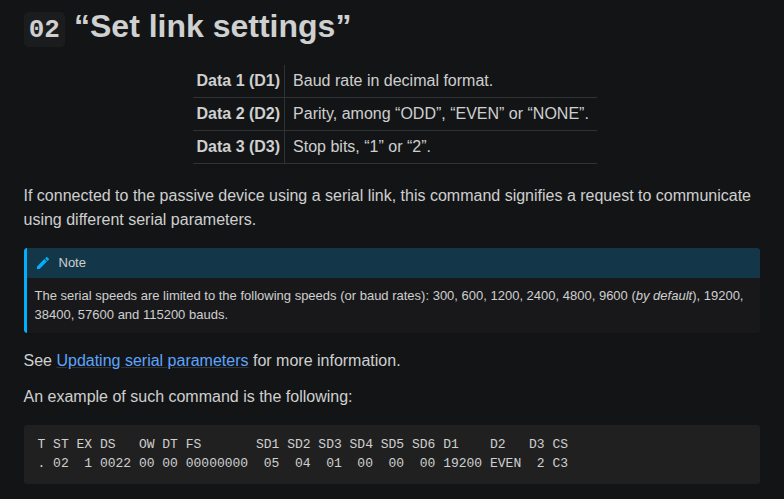
Description of command 02 for Protocol 7.00, generated by the seven-command directive (except for the title).
In order to do this, I've created the SevenCommandDirective and registered it using sphinx.application.Sphinx.add_directive.
It rarely happens that I move around some elements in the documentation, but still want to keep old links working. In such a case, I needed a way to provide the information to nginx on the host server all of the redirections, so that it can apply them and return HTTP 301 responses in the correct cases.
I ended up adding a redirects property definition in conf.py, resembling the following:
redirects = {
    "/install-guides/": "/guides/install/",
    "/contribution-guides.html": "/guides/contribution.html",
    ...
}
From here, I connect to Sphinx's build-finished hook to create a _redirects.nginx file in the build directory, with rewrite instructions of two types:
In the case of an original path ending with a /, a path only translating the beginning of the path, e.g.:
rewrite ^/install-guides/(.*)$ /guides/install/$1 permanent;
In other cases, a path translating the exact string escaped, e.g.:
rewrite ^/contribution-guides\.html$ /guides/contribution.html permanent;
On the host server, in the corresponding server block, I add the following:
include /path/to/www/_*.nginx;
Even though it does not have the best documentation or the easiest extension framework, Sphinx is a great framework for writing and organizing docs, even for non-Python projects, and these few tweaks have been done over a year of using the documentation, based on user feedback and my own tastes.
While all modifications described in a single go may seem quite a handful, they are not, and are actually mostly optional and based on my own views of a practical and beautiful documentation. Hopefully it does not refrain you from using Sphinx, or even write docs for your own project; and it gives you ideas on how you can improve upon existing documentation you maintain.
Cahute is a project with many challenges, and the completeness and navigability of its documentation is one of them, especially since it describes undocumented proprietary communication protocols and file formats that were hard to find exhaustive documentation for before. My hope is that these tweaks help bringing out the existing content in the documentation, in order for information regarding these not to be lost!